
Sending email with SES from Delphi
A small Delphi console program that sends transactional email through Amazon SES v2, covering verified identities and the move out of the SES sandbox.

Contents
Amazon SES is managed email. You hand it a message and it delivers it: order confirmations, password resets, the notification that a long-running job has finished. No SMTP server to run, no IP addresses to warm up. It's the piece most applications reach for the moment they need to send mail that has to arrive.
This post sends one email from a small Delphi console program. Before the code, two things need setting up: SES only sends from identities you've verified, and a new account starts life in a sandbox that won't mail the wider world. Both are quick.
What you'll need
- Parts 1 to 3 of this series completed. The SDK is installed, credentials are configured, and you know how the SDK's exception hierarchy works.
- An AWS account with SES access.
- A verified sender identity (we set one up below).
- Delphi 11.x, 12.x or 13.x (any edition from Professional to Architect).
Verified identities
SES won't send from an arbitrary address. You first prove you control the address or domain you want to send from, and SES calls that a verified identity.
The quickest one to set up is a single email address. In the SES console, open Identities, click Create identity, choose Email address, and enter one you can read. SES sends it a confirmation link; click it and the identity flips to verified. A domain identity is the better choice for anything real because it lets you send from any address at that domain and unlocks DKIM signing, but a single address is enough to get a message out the door today.
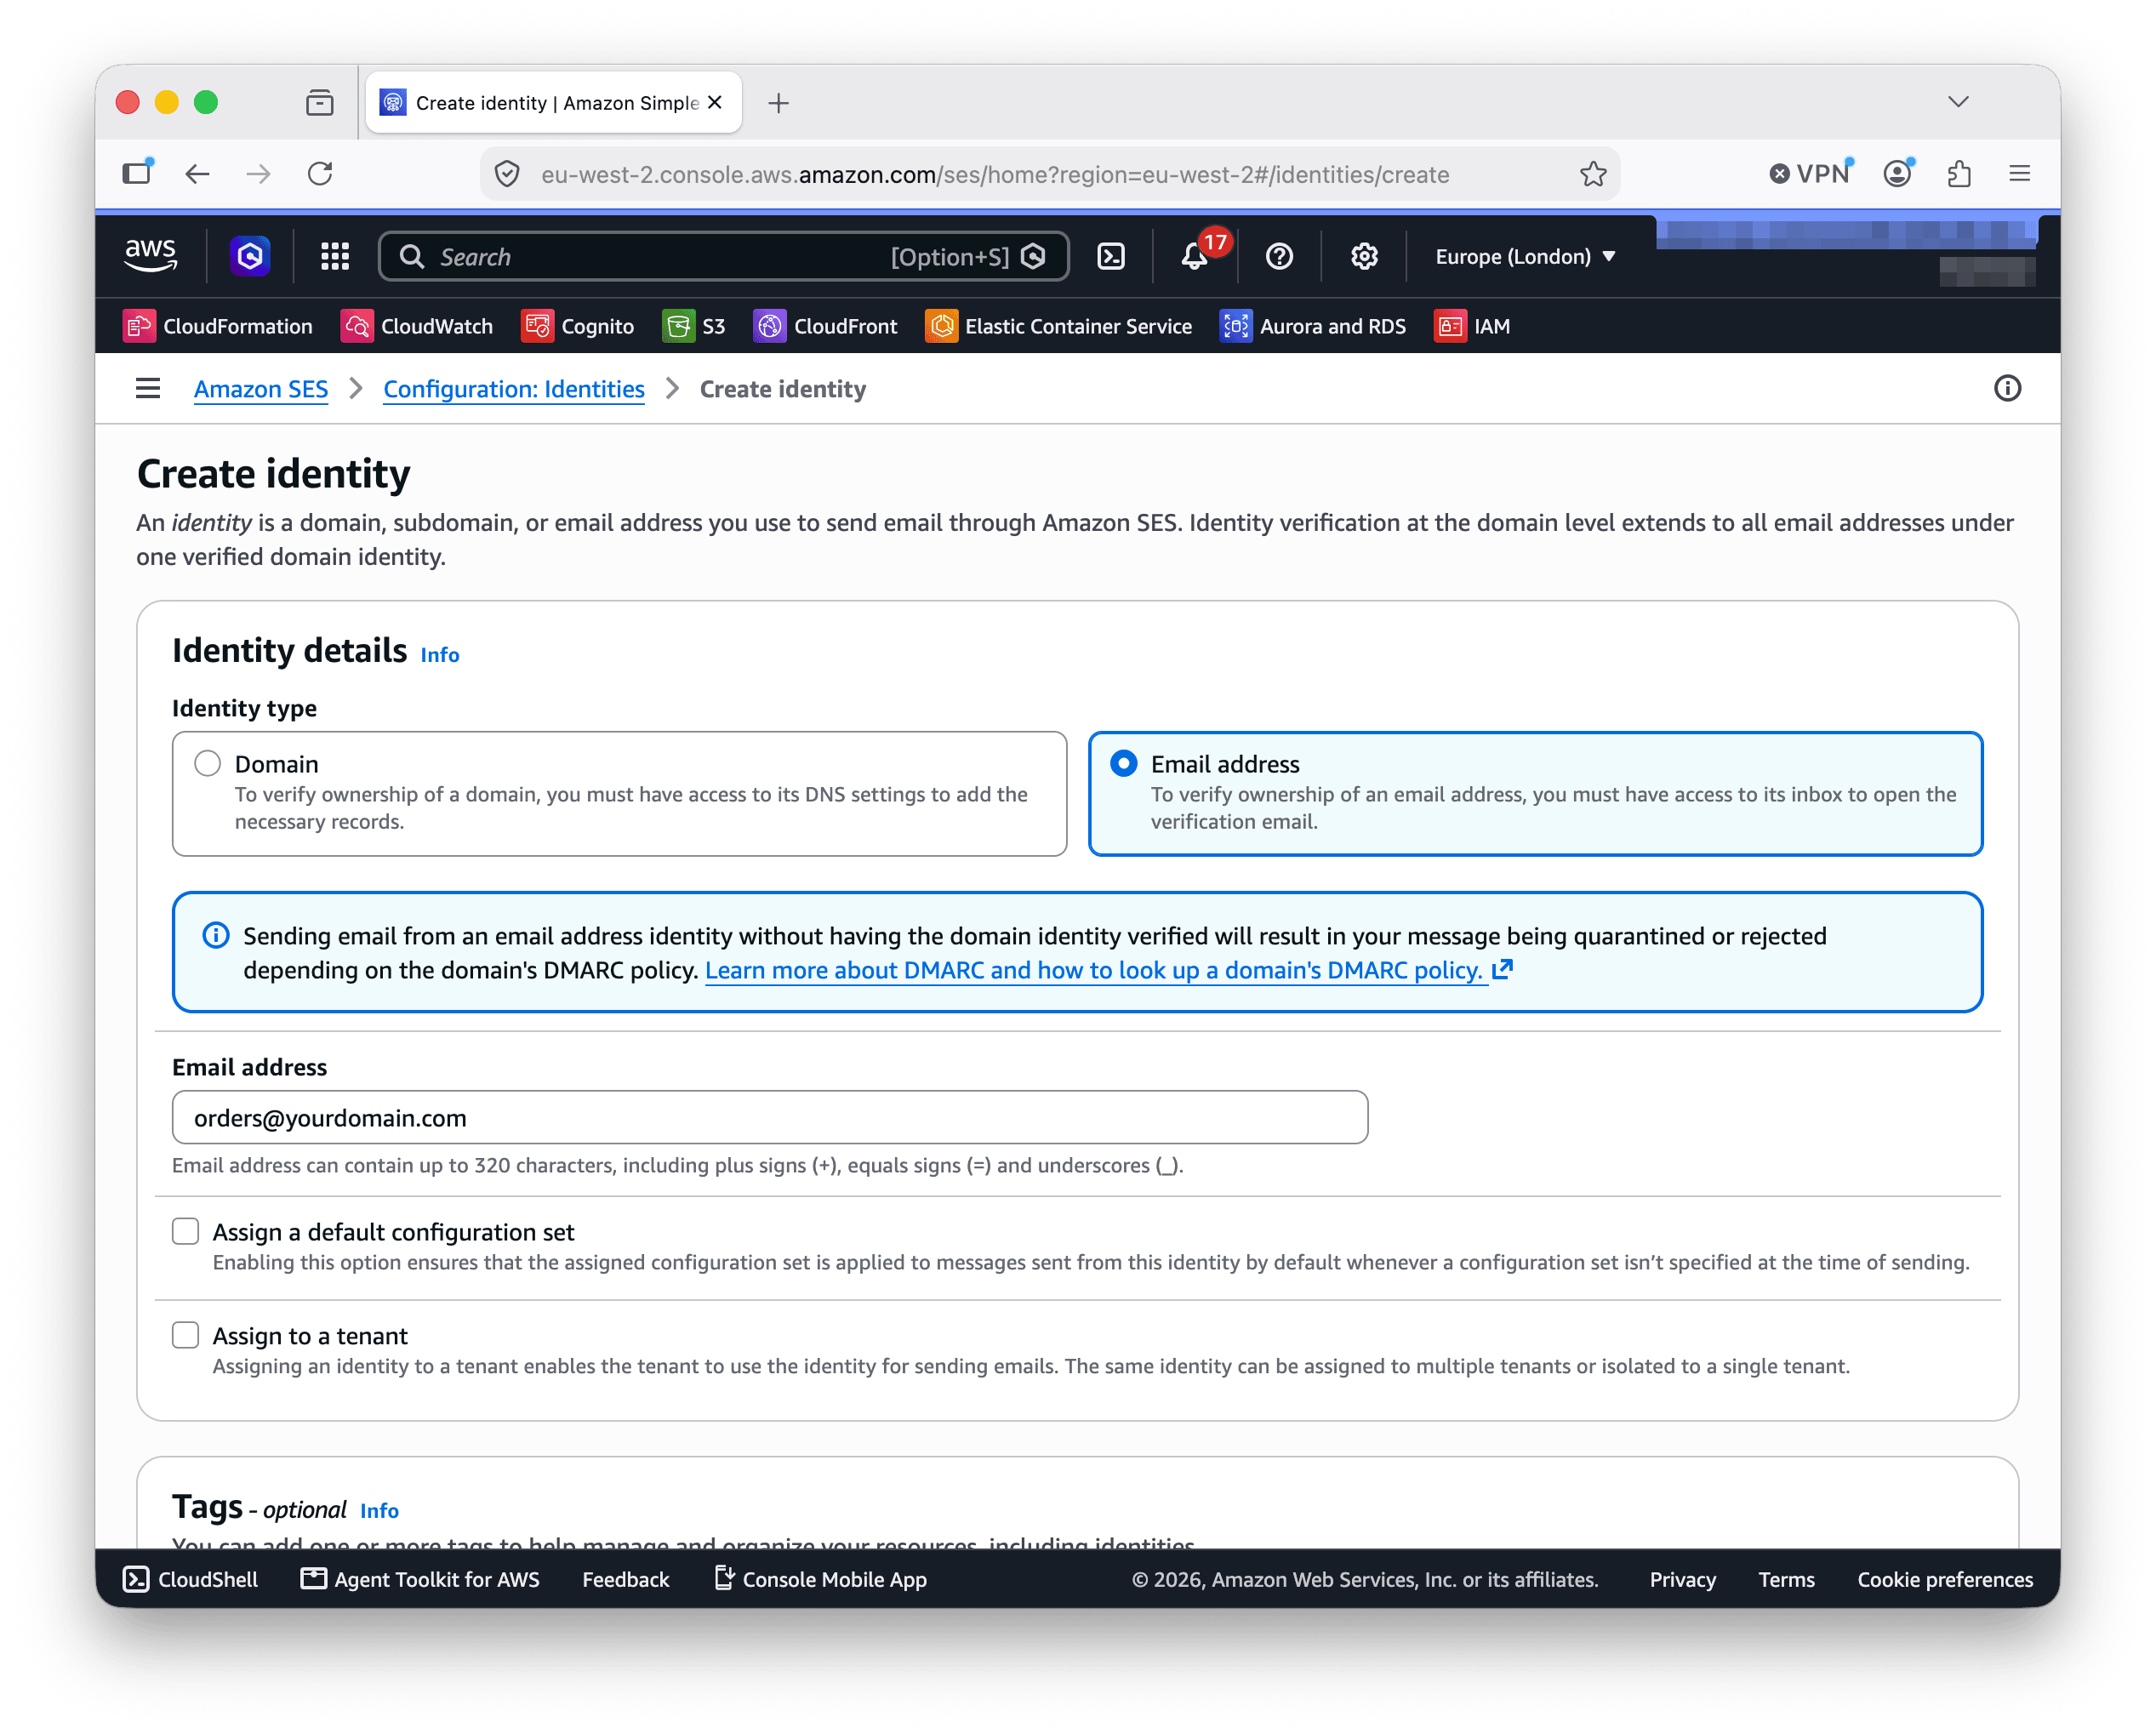
From code, ListEmailIdentities on the client returns the identities on the
account, which is how the GUI sample at the end of this post fills its sender
dropdown. For sending, all you need is one verified address to put in the
From field.
The sandbox
Every new SES account starts in the sandbox. The sandbox exists so a compromised or misconfigured account can't be used to blast spam before anyone notices, and it changes two things. You can only send to addresses that are themselves verified, and your daily volume and send rate are capped low.
For this tutorial that's fine: verify a second address you own, send to that, and you'll see the whole flow work end to end. For production you request access through Account dashboard > Request production access in the SES console. AWS asks how you handle bounces and unsubscribes, and approval usually lands within a day. Once you're out of the sandbox you can send to any recipient, and the sending limits rise from there.
Worth knowing which side of that line you're on before you wonder why a message to an unverified address was rejected.
Sending an email
Here's the whole program. It builds a message, sends it, and reports what happened.
program SendMail;

{$APPTYPE CONSOLE}

uses
  AWS.SESV2,
  AWS.Types,
  System.SysUtils;

var
  Client: ISESV2Client;
  Request: ISESV2SendEmailRequest;
  EmailMessage: ISESV2Message;
begin
  try
    Client := TSESV2Client.Create;

    EmailMessage := TSESV2Message.Create('Your order has shipped');
    EmailMessage.Body.Text := TSESV2Content.Create('Tracking number: 1Z999AA10123456784');

    Request := TSESV2SendEmailRequest.Create;
    Request.FromEmailAddress := 'orders@example.com';
    Request.Destination := TSESV2Destination.Create;
    Request.Destination.AddToAddress('customer@example.com');
    Request.Content.Simple := EmailMessage;

    Client.SendEmail(Request);
    Writeln('Sent.');
  except
    on E: EAWSException do
      Writeln('Error: ', E.Message);
  end;
end.
Put a verified address in FromEmailAddress. In the sandbox, put a verified
address in AddToAddress too.
The shape is the one this series has used throughout: create a client, build a
request, make the call, catch EAWSException. The credential chain from Part 2
supplies the keys automatically, so there's nothing to wire up here. The client
defaults to the region your credentials resolve to; SES identities are
per-region, so verify the sender in the same region the client talks to or the
send fails with an identity error.
The message itself is three pieces. TSESV2Message holds the subject and the
body. Body.Text is the plain-text version; there's a matching Body.Html when
you want a formatted message, and sending both lets each client pick what it can
render. TSESV2Destination holds the recipients, with AddToAddress for the
main ones and companion calls for Cc and Bcc. Content.Simple ties the message
to the request. There's also a templated-content path for when you're sending
the same layout with different values, but a simple message is all this needs.
Compile and run it. The program prints Sent. and the mail lands in the
recipient's inbox a moment later:
> SendMail
Sent.
If the address isn't verified, or you're in the sandbox and the recipient
isn't, the send raises an EAWSException and the message text tells you which.
When email bounces
Sending is the easy part. Staying deliverable is about what happens when a message doesn't arrive.
When a message can't be delivered the receiving server returns a bounce, and when a recipient marks one as spam that's a complaint. SES tracks both as rates across your recent sending, and it holds you to them: let either climb too high and SES puts the account under review and can pause your sending entirely. A high bounce rate reads as a list you don't maintain; a high complaint rate reads as mail people didn't want. Those two numbers are your sender reputation, and SES acts on them.
The practical response is to capture bounces and complaints and act on them: stop mailing an address that hard-bounced, honour every complaint as an unsubscribe. SES reports these events through a configuration set that publishes to an SNS topic. Point that topic at an SQS queue and you're back on the poller from Part 4, reading delivery events off the queue and updating your records. The mechanism is the same shape as everything else here; wiring it up is worth doing before you send anything that matters.
A GUI version
The console program keeps the focus on the SDK, but "compose and send" wants a form. There's a ready-made one in the samples repo: SESSendEmail. It's the same API behind an FMX form that lists your verified identities in a dropdown, lets you pick a region, and sends what you type. It's built in FMX, but the controls and the SDK calls are identical under VCL Forms if that's your preference.
What's next
The series wraps up with ReadWhatYouSee: a single app that reads text out
of an image with Textract, translates it with Translate, and speaks the result
with Polly. Three services in one program, each the same shape you've now seen
five times over: create a client, make a call, catch EAWSException.
More posts
Self-hosted S3-compatible storage from Delphi
Run your own S3 endpoint and point the AWS SDK for Delphi at it: MinIO, RustFS, and SeaweedFS, one program against all three, and where MinIO's archival leaves things.
Read more →
Build ReadWhatYouSee: Textract, Translate, and Polly together
The series finale: a Delphi app that reads text from an image with Textract, translates it with Translate, and speaks it aloud with Polly.
Read more →
Cloudflare R2 from Delphi
Point the AWS SDK for Delphi at Cloudflare R2: bucket setup, access keys, region and endpoint config, and a worked example end to end.
Read more →